How to Make a French Drain
Share
How to Make a French Drain in Your Yard for Improved Drainage
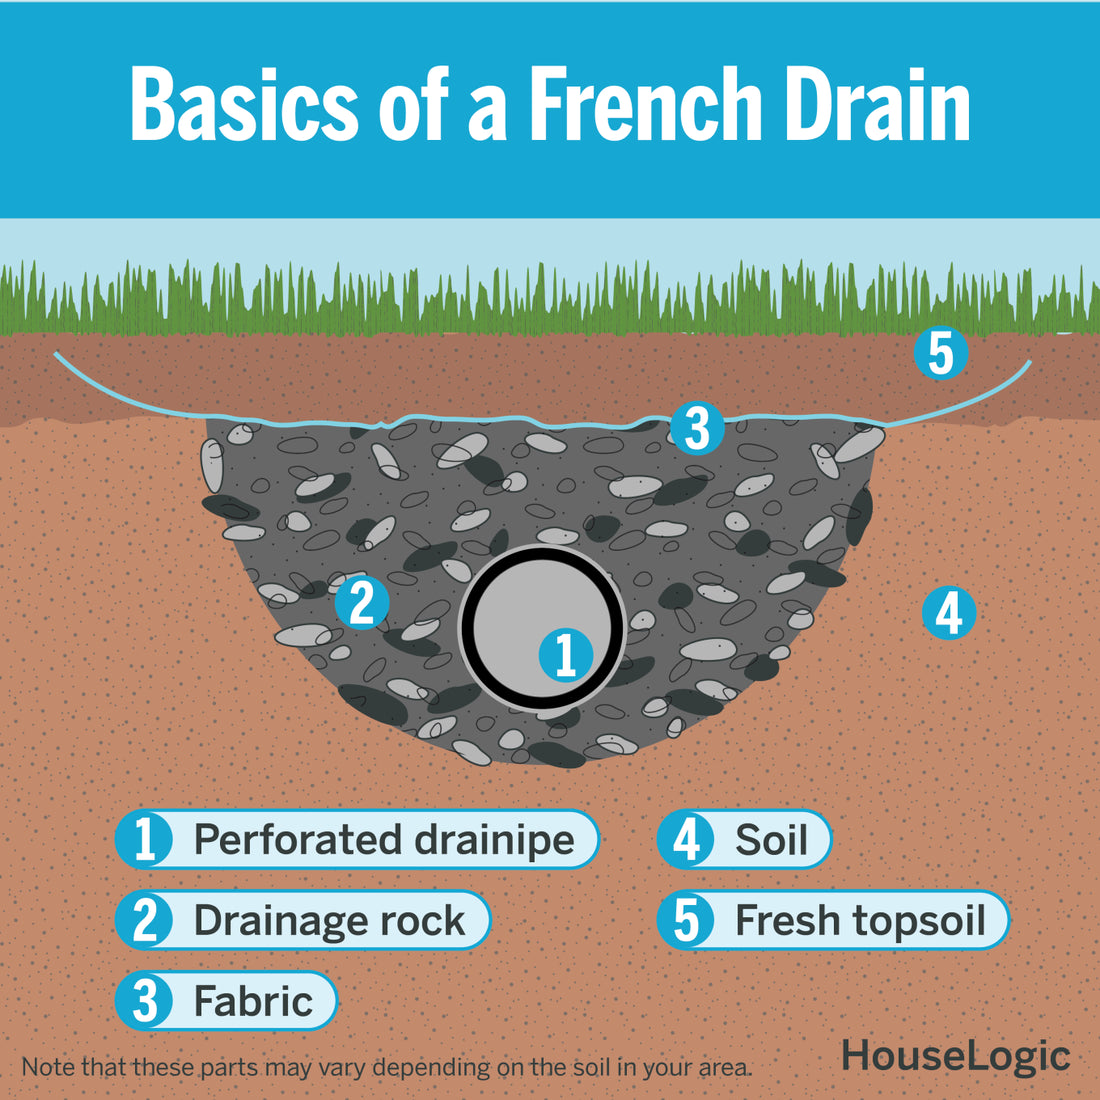
A French drain is a simple yet effective solution to excess water in your yard, whether it’s pooling after heavy rain, flooding a low spot, or threatening the foundation of your home. The design is quite straightforward: a gravel-filled trench with a perforated pipe that redirects water away from problem areas. Here’s a step-by-step guide to help you create a French drain in your yard and eliminate those drainage issues.
Materials You'll Need:
- Perforated Drain Pipe (4-6 inch diameter, depending on the size of the area)
- Gravel (Coarse gravel or drainage stone)
- Landscaping Fabric (To prevent clogging from soil)
- Shovel or Trenching Tool (For digging the trench)
- Level (To ensure proper slope)
- Grate or Catch Basin (Optional, if you need a water collection point)
Step 1: Identify the Problem Area
The first step in installing a French drain is identifying where excess water collects. This could be a low-lying part of your yard, an area near your foundation, or a place where water tends to pool after heavy rain. The goal is to reroute the water to a more desirable location, such as a storm drain, a garden bed, or a dry well.
Pro Tip: Walk around your yard after a rainstorm to observe how water flows and where it collects. This will help you determine the best location for the drain and where it should lead.
Step 2: Plan the Drainage Path
Once you've determined where water collects, map out the path for your French drain. The trench should slope downward, so gravity will naturally guide water through the pipe to its end point. Ideally, the slope should be about 1 inch for every 10 feet.
Planning tips:
- The end of the drain should empty in a place where water can naturally disperse, such as a storm drain, gravel-filled area, or a rain garden.
- Use a level or string to make sure your trench has the correct slope.
Step 3: Dig the Trench
Now it’s time to dig. The depth of your trench should be between 18 and 24 inches, with a width of about 12 inches to ensure enough space for the pipe and gravel. Keep the slope in mind while digging.
Tools tip: Use a trenching shovel, which makes the digging easier and helps you create a narrower, deeper trench.
Step 4: Line the Trench with Landscaping Fabric
To prevent soil from clogging your drain over time, line the trench with landscaping fabric. This will act as a barrier between the soil and the gravel while still allowing water to flow through.
- Make sure the fabric is wide enough to cover the bottom and sides of the trench, with some extra on the edges so you can wrap it around the gravel later.
Step 5: Add Gravel
Pour about 2 to 3 inches of gravel (use drainage stone or coarse gravel) into the bottom of the trench. This provides a stable base for the perforated pipe and ensures that water will flow freely into the system.
Step 6: Place the Perforated Pipe
Lay the perforated pipe in the trench with the holes facing down. This may seem counterintuitive, but it ensures that water is collected from the bottom up as it rises into the pipe. This method improves the efficiency of the system by collecting the water at its lowest point.
Pipe tip: If you're dealing with a large area, use fittings to connect multiple lengths of pipe.
Step 7: Cover the Pipe with Gravel
Once the pipe is in place, cover it with more gravel, filling the trench to about 3-4 inches from the top. The gravel will help filter the water and prevent the pipe from clogging while promoting easy water flow.
Step 8: Fold the Landscaping Fabric Over
Now, fold the remaining landscaping fabric over the top of the gravel. This will prevent dirt and debris from entering the gravel and clogging the system over time. Make sure the fabric completely covers the gravel.
Step 9: Fill the Rest of the Trench
Finally, cover the rest of the trench with soil or sod to blend the drain into the rest of your yard. You can also place decorative stones on top if you prefer a more finished look.
Step 10: Test Your French Drain
Once installed, test the system by spraying water on the problem area or waiting for the next rainstorm. If the water drains away properly, your French drain is functioning as it should!
Maintenance Tips:
- Periodically check the drain to ensure it remains clear of debris.
- If you notice slow drainage or water pooling, you may need to clear the perforated pipe or replace the gravel over time.
Benefits of a French Drain:
- Prevents water pooling: By directing water away from problem areas, you protect your yard and home from erosion, muddy patches, and structural damage.
- Reduces basement flooding risks: A well-placed French drain can help prevent water from seeping into basements or crawl spaces.
- Low-maintenance: Once installed, French drains require little upkeep.
A French drain is an affordable and effective solution for managing water drainage in your yard. By following these steps, you can create a reliable system that keeps your landscape dry, functional, and healthy for years to come!
Get all your French Drain Supplies Here!
