Determine the size and shape of the required area for landscaping with synthetic grass.
Measure and map out the proper measurements of the general area.
The layout of the synthetic grass should have the product in mind during layout. The turf rolls are sold in 15' Wide rolls. There is a natural fiber direction in regard to the way the carpet is installed and MUST be installed consistently when installing multiple pieces together. Include waste materials to accommodate for faster installation practices. Designing the backyard around the roll sizes is an easy way to save money and labor costing.
Designing a base that will allow water to pull away from water sensitive structures such as houses / sheds or pools. Building a proper base is key to having a long-lasting synthetic turf yard.
Make a list of products such as adhesive, seaming tape, nails, edging and the infill material you require to have all the products on hand ready to install.
Call or visit your closest dealer location to ORDER all your materials. Typically, the turf and accessories ship fairly fast but giving yourself a few days prior to order will help ensure products are ready in a timely fashion.
Before excavation we strongly recommend having all utility lines marked for safety and the chance something will be damaged during the installation.
INSTALLATION OF BASEWORK
Remove sod or any other existing material from selected area.
Determine amount of removal needed to install base materials.
Ensure correct measurements of turf layout is completed
Ensure correct grade of sub-base
Install any drainage system if necessary or a Geo Textile if required to help stabilize soil and prevent base contamination.
Spread crushed aggregate base to a depth of 3 inches and set desired grade. Compact with plate compactor. Add 1 inch of fine granular material to fine tune and level base to create a smooth and consistent finish grade.
Compact stone for final compaction and smooth base to finalize any imperfections.
INSTALLATION OF PLAYGROUND SOFT PAD (IF REQUIRED)
Begin installing panels along the straightest edge of the lawn.
Install panels in rows. You may wish to cut a panel in half and stagger every other row. Staggering in a brick pattern is recommended.
Cut pad around poles and other obstacles on your lawn.
INSTALLATION OF SYNTHETIC GRASS
Place first role of grass onto stone base carefully. Try not to disturb the base prior to unrolling. For the best finish it is also recommended that you face the natural lay of the grain facing or point towards the most used or viewed area. (Fibers pointing towards viewing area typically towards the house.)
Unroll the second piece of turf beside the first roll and maximize your positioning. It is VERY IMPORTANT that you keep the direction of the fibers facing the same direction as the first roll.
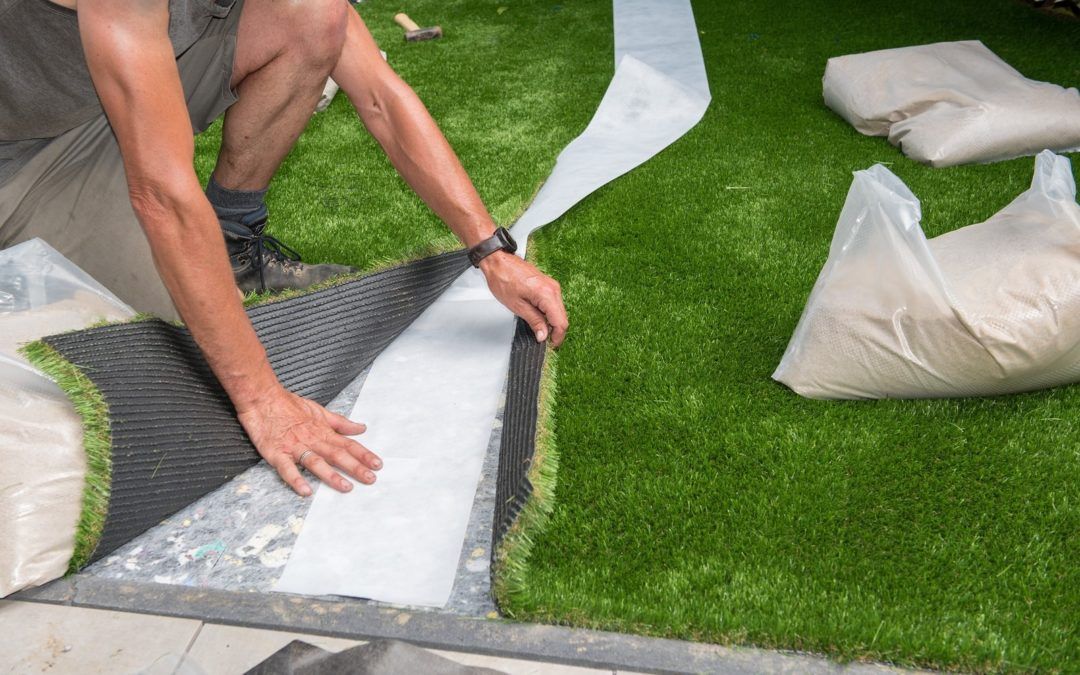
Prep the edge of the turf from the back side of the turf. It is our recommendation that you prep the edge by cutting off the first row of stitching with a very sharp utility knife. Avoid cutting the remaining fibers. This process will create a nice seam for lining the two pieces together.
Seaming the 2 pieces is the next step. Making sure your first piece of turf is lying in the proper position without buckles. The second roll slides into place and line up with a maximum of 1/4 inch gap between rolls. Any overlapping must be cut off or adjusted in the panel position.
Once in proper position it is recommend securing or temporarily secure the turf to prevent shift. Long nails or sandbags work great for this.
Repeat previous steps until turf is all prepped and cut into place. Trim the ends of the turf to adjust around any structure not allowing the turf to sit flat and consistent.
SEAMING OF THE TURF
Check seams to ensure gap width is no more than 1/4 inch and that pieces aren't touching or overlapping.
Install or roll out seaming tape with the fussy side facing UP. You are looking to install the tape directly down the middle of the turf seam. If wind or shifting of the tape is possible then add nails to hold in place. We recommend removing the nails after applying the adhesive to promote proper stretching of the turf after turf is laid.
Flip the turf edges back from the seam. We recommend no more than 1 to 2 feet. Try to flip over consistently across the seam not to allow any major buckling of the turf.
Spread adhesive along seam tape with a 3/16 V-Notch trowel. We recommend a coverage of 4 to 6 inches minimum on either Side of turf being installed. Please follow instructions on the Glue or adhesive being used. Our recommended brand is (XGS Glue 1 Gallon) this is a one-part moisture curing polyurethane.
Lay flipped edges back onto seam tape, making sure to control both edges so that turf fibers do not get into the adhesive. We recommend following the Adhesive recommendations for lay time. Generally speaking, you can lay the seam right away.
Firmly press the seam to adhere turf to the adhesive. We recommend placing the sandbags along the seam for 1 hour to apply pressure.
Repeat steps for each seam making sure that each panel has not shifted prior to applying adhesive.
TRIMMING OF THE TURF
Trim outer perimeter as desired. Using a sharp utility knife is always best practice and will achieve proper results. Also cut the turf to a perfect finish or a slight gap around objects or perimeter. If the turf is not cut perfect can cause a bump on the finished product or possible trip hazard. Please use good judgement and take your time during this process.
Nailing the perimeter is very important to secure the edge. We only recommend you nail the outside edge. We do not recommend nailing seams or anywhere throughout the body of the panels. We recommend you use a 6" spiral nail in warmer clients but do typically recommend an 8 to 10° Nail in colder climates. Secure the turf every 10 to 12" on the perimeter 1 inch off the perimeter.
INSTALL OF INFILL
Use recommended sand or alternative infill for your turf. Speak with a Tierra Supply representative to determine the type and amount of infill needed for your lawn. Typically, we recommend 1 to 2Ibs of sand being used in all landscape model turfs we offer. It is always recommended to install sand when the turf is dry. Wet turf can cause clumping and the material will not drop evenly or at all.
Use a drop spreader to spread infill in even rows across your lawn.
Spread approximately 1/4 of your infill supply before brooming.
Power broom turf against the grain so that turf fibers stand up and allow the infill to work its way into the bottom of the turf.
Spread another 1/4 layer of infill over the lawn and power broom or broom materials in.
Continue to spread at this fill amount until complete and power broom or broom until you have used your infill supply.
COMPLETION
You have now completed the installation process for your synthetic lawn. We recommend you blow off or rake any loose fibers and lightly shower the turf to wash any construction dirt or dust away.
Reach out to Tierra Supply Co if you would like to submit a picture of your finished project to the company. If you encounter any issues during your installation process, feel free to call Tierra Supply at 727-250-4009. We thank you for choosing Tierra Turf as your preferred Synthetic Turf provider. We are confident that you will enjoy the products and installation process. www.TierraSupplyCo.com